Webinar Overview – Imagine Your Image

Our most recent recorded webinar was a “Techie How To” in which we looked at some of the tools in a simple free image editor – PhotoFiltre. I use PhotoFiltre a lot because I rarely need the more sophisticated features such as layers. This was one of those sessions where I did the presentation as well as facilitating. I always find it more difficult to write an overview for these as I feel too close to the content to be as objective as I should be. I always welcome comments on any of these webinar overviews but particularly so when I have presented the content and thus am not sure about my own objectivity!

The Session

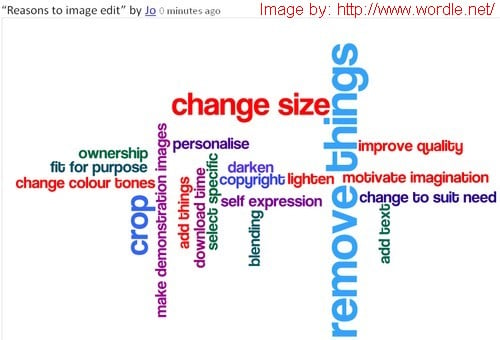
I very much enjoyed doing this session – as I was able to show one of my favourite “e-toys” (PhotoFiltre) through the medium of another (Elluminate). We began by finding out where we were all coming from on image file formats and editing, followed by some quick thoughts on why we and our students might want to edit images.

ImageEditReasons

Size changing and cropping (used most by my students, my colleagues and myself) were both suggested several times. We then moved on to consider briefly the features of a basic image editing application that we would consider most important for ourselves and for our students. Easy to learn and free topped the polls.

Next we took a quick look at the accessibility and functions of some of the most frequently used tools (all on drop-down menus). Size is one of the most significant items that we all often need to change to suit different contexts so we looked briefly at some common sizes we might use and also at the impact of when we make the change on file sizes and consequent download times. Other tools briefly reviewed included cropping, adjusting colour balance, brightness/contrast and filter effects.

Then it was time to play! I shared PhotoFiltre from my desktop and invited participants to try out some of the tools on some pre-loaded images by taking control of my desktop. Using application share in this way has some limitations – for example there is an inevitable lag in response when the mouse is being controlled remotely. However I feel that it has great benefits from the interactivity point of view and is more effective than simply using the sharing to demonstrate. I would love some feedback on this! We finished the session as usual with questions and feedback.

Conclusion

My personal liking for PhotoFiltre is because it is easy to use and free to download and is thus a good option for my students who are literacy/numeracy students working online. They often have both limited access to computers and limited IT skills. I have also suggested it to many of my colleagues as they rarely need sophisticated editing capacity such as layers and they also find it very useful for basic cropping and size changing especially of images they intend to upload into the Learning Management System. If you do need features such as layers then you could take a look at GIMP also free.

Next Webinar

SerendipitybsmallOur next Webinar is an Edublogs Serendipity – unconference session so bring along your hot topics and burning issues (what makes you spit with anger or thump a tub with passion) and throw them into the melting pot for the poll to choose our topic in the first ten minutes.

Join us on Thursday July 8th at 23:00 GMT/UTC (7pm USA EST, Midnight BST) or Friday July 9th at 1am CEST,7am West Aus, 9am NSW, depending on your timezone – in the usual Elluminate room

.

Give ‘em a piece of the action!

The second of two related posts about using Application Share (App Share) in Elluminate sessions. The reason for this post is to cover some of the “nuts and bolts” and briefly touch on some of my personal strategies in using Application Share. These were not covered in detail during the Elluminate session “Share and Share Alike” or the related post.

If you have been in Elluminate sessions you have probably experienced Application Share. It is often used by presenters to show a website or application to participants and sometimes is used as the basis of an entire presentation. In my personal opinion using a WebTour is more effective for websites, however it is not possible to WebTour if you want to show a password protected site.

Many people use App Share very effectively to show sites or applications but this can be a bit “teacher centred” and occasionally can turn into something similar to “death by powerpoint”. It is also very easy to fall into the trap of using App Share to show participants a document you want them to read. My advice would be “don’t do it!” Every time you scroll the screen will be refreshed for all participants – it will take different lengths of time to refresh for each participant. Some will be impatient because they have finished what is visible, some will be frustrated because they are never able to read any of it before the next refresh. File Transfer is much more effective – participants can then read at their own pace. There are also alternatives if you must put up one copy for all to see. Either take the time to pre-prepare by using the editable text tool on the whiteboard to create a series of whiteboard sized “chunks” to be displayed successively, or take App Share “snapshots” and place on whiteboards. This last can also be useful to substitute for direct sharing if you have participants with slow updating.

I use App Share myself occasionaly for a very quick, “off the cuff” show and tell. However I use it mostly to share applications interactively ie to enable participants to work with the content directly on my desktop by giving individuals control of my desktop. Secondarily I use it to troubleshoot problems for remote students by requesting control of their desktop.

There are several alternatives for sharing your desktop in Elluminate. It is possible to share your entire desktop. This is something I do extremely rarely as there are some risks in relation to privacy. You can also share specific applications – the app you plan to share must be open before you begin the share. Also if you have two screens make sure that it is “seen” by Elluminate. The sharing that I use most frequently is to share a region of my desktop. This is a personal preference and I find it easier all round as I can set aside a piece of screen and just move applications or anything else I want to share into that space.

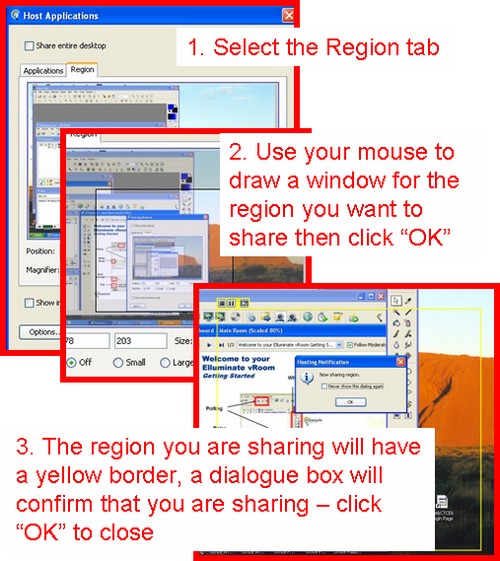
Sharing a region is fairly straightforward.

AppShareHowTo1

Once you reach the “Host Applications” menu …

AppShareHowTo2

My favourite aspect of App Share is the potential for giving someone else control of what I am sharing. This is closely followed by the fact that a participant can give me control of their desktop so that I can demonstrate something directly on their computer or troubleshoot a problem for them. There are several reasons why I really like using these options including the following:

  • I like to keep sessions as interactive as possible – it is all too easy for people to “switch” off in a virtual room & I don’t see their body language to tell me they are bored.
  • Giving control to a specific individual enables me to ensure “taking turns” this is often an issue for me in face-to-face situations because many of my students are Youth at Risk and they often lack social interaction skills and will “talk over” their peers or teacher.
  • If I give control to an individual this enables me to see that they are able to use specific tools in an application – in my context where assessment is often observational and/or evidence based it gives greater validity.

Giving control of shared applications is very simple:

  • Highlight name of the participant to whom you wish to give control
  • Go to “Tools” and select “Application Sharing”
  • Select “Give Control of Shared Application”
  • You will then get a message indicating that you are giving control, “OK” this
  • The shared area will now have a pink border
  • Keep your hands away from the mouse – otherwise you will be fighting for control of the shared region
  • To regain control use “Ctrl+Space”

It’s a good idea to leave your microphone on throughout (unless you have someone else needing to speak). Although you can control the mic with Ctrl+F2 this may “jump” Elluminate to the front so that it covers the shared region – this occasionally happens to me even when I have resized my Elluminate screen to avoid covering the shared region.

I feel it is really important that students have the opportunity to practise remote control of my desktop and that this is done in a friendly and supportive group context. For the initial tryout and practise I use icebreaker type games, at first with a simple task untimed. As the participants become more confident and competent at dealing with the inevitable lag in response when working remotely I sometimes time them in completing the task. However the great thing with Elluminate is that if someone is really struggling we can always blame the technology and thus avoid damage to self esteem.

There are too many interactive App Share type activities/strategies to cover in detail here – some of those I have used successfully include:

  • Icebreaker and team-building activities for developing positive group dynamics
  • Students work in pairs/small groups in breakout rooms (you don’t need to be the moderator in order to share your desktop), completing collaborative tasks on one person’s desktop or peer tutoring
  • A moderator moving with a student into a breakout room and using sharing for troubleshooting, individual support or assessment
  • Learning and practising an App by taking turns to use a tool/achieve an effect with support and feedback from the rest of the group
  • Coaching an individual through a new task/activity while the rest of the group watches as a demo, or having another participant coach someone through a task/activity.

These are just a few of the possibilities for interactivity with App Share in an Elluminate room. As usual I have written far too much, so it’s definitely time to stop. Hope you have fun giving participants “a piece of the action”.

Share and Share Alike

The first of two related posts about using Application Share (App Share) in Elluminate sessions.  This post is about our recorded Edublogs webinar this week which focussed on avoiding “death by Application Share presentation” in Elluminate sessions. In other words it was about using App Share in a way that allows interactivity rather than just as something for participants to watch. The second post will be about the mechanics of App Share and some of the strategies I use.

As usual we had global participation although this week there were more Australians in the session – probably due to Steve Hargadon’s initiative regarding the Australia Series on LearnCentral and the fact that we are trying to be organised enough to put sessions on the Australia Series events calendar in LearnCentral and on the Events Calendar in The Educator’s PLN Ning as well as in the usual place on the Edublogs Live Events Calendar at the bottom of the Live Events page.

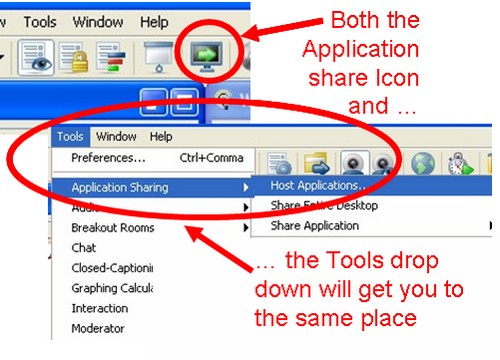
The session was great fun! Everyone was lively and vocal (both on audio and in text chat) and also very willing to experiment – this always makes for excellent sessions with lots of ideas exchanged. We started with a look at where everyone was coming from with respect to Application Share. Followed by a look at the AppShare menu to indicate which items we were going to explore – this included giving and taking control of remote desktops and a quick overview of the different ways of sharing applications on Elluminate.

Menu

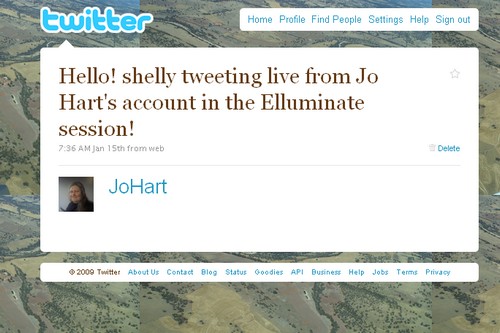
We spent a little time on the pros and cons of the different options for sharing and also on some of the possible issues that can arise. Then it was playtime! My absolute favourite part of all these sessions is the time when we try out features of Elluminate that make it a great tool for interactivity. We did this mainly through sharing my desktop in different ways and giving everyone an opportunity to take control of my desktop and work on it remotely. The first opportunity was an icebreaker game that I use to give people practise at using a mouse on a remote desktop, and the second was for people to use my desktop to Tweet live from my Twitter account on my desktop.

RemoteTweet

Everyone did brilliantly – the first time you work on someone else’s desktop it is always a bit difficult because there is an inevitable lag. However this posed few problems for the group as they demonstrated their great remote control skills!. As the person whose desktop is being remote controlled you have to keep your hand well away from the mouse or you end up fighting for control – this can lead to much hilarity but can also be very frustrating for the remote controller who is being hijacked.

To finish off the session we had some feedback to help us in the future and also asked for topics of interest that we might address in future sessions.

Next week we have an Edublogs Serendipity – unconference session so bring along your hot topics and burning issues and throw them into the melting pot for the poll to choose our topic in the first ten minutes.

Join us – depending on your timezone – on Thursday January 21st at 23:00 GMT (6pm USA EST, Midnight CET) or Friday January 22nd at 7am West Aus, 10am NSW. On Elluminate as usual in the Edublogs Elluminate room